本系列文章很多知识点来源ios核心动画高级技巧一书,提供了完整的绘图动画学习路线,强烈推荐阅读!
前面通过Core Graphics(Quartz 2D)和CAShapeLayer与UIBezierPath结合可以随心所欲的绘制我们想要的图形。
但是有些不足的是绘制的图形都是静态的,动画就是让这些图形动起来。
隐式动画、显式动画


一、隐式动画
1、什么是隐式动画?
每一个UIView内部都默认关联着一个CALayer,我们可以称这个Layer为Root Layer(根层),所有非Root Layer,也就是手动创建的CALayer对象,都存在着隐式动画
- 当对非RootLayer的部分属性进行修改时,默认会自动产生一些动画效果
- 而这些属性称为AnimatableProperties(可动画属性)
- 也就是说,对非根层的layer可动画属性进行修改产生的动画,就称为隐式动画
- 之所以叫隐式是因为我们并没有指定任何动画的类型。我们仅仅改变了一个属性,然后Core Animation来决定如何并且何时去做动画。
- 隐式动画是指通过UIView的
animateWithDuration:animations:方法创建的动画。无须创建动画对象,只需改变动画层的属性,让核心动画自己去完成动画效果, 例如(CATransaction)。
1
2
3
| bounds:用于设置CALayer的宽度和高度。修改这个属性会产生缩放动画
backgroundColor:用于设置CALayer的背景色。修改这个属性会产生背景色的渐变动画
position:用于设置CALayer的位置。修改这个属性会产生平移动画
|
2、可以通过动画事务(CATransaction)关闭默认的隐式动画效果
1
2
3
4
5
6
7
8
9
10
11
12
13
14
15
16
| - (view)moveLayer:(BOOL)animation {
if (animation) {
self.myLayer.position = CGPointMake(100, 100);
[self.btnOfMove setTitle:@"还原" forState:UIControlStateNormal];
return;
}else {
[CATransaction begin];
[CATransaction setDisableActions:YES];
self.myLayer.position = CGPointMake(150, 150);
[CATransaction commit];
}
}
|
http://www.jianshu.com/p/966928e9cf49
隐式动画是ios4之后引入sdk的,之前只有显式动画。从官方的介绍来看,两者并没有什么差别,甚至苹果还推荐使用隐式动画,但是这里面有一个问题,就是使用隐式动画后,View会暂时不能接收用户的触摸、滑动等手势。这就造成了当一个列表滚动时,如果对其中的view使用了隐式动画,就会感觉滚动无法主动停止下来,必须等动画结束了才能停止。
二、显式动画
显式动画是指用户自己通过beginAnimations:context:和commitAnimations创建的动画。
显示动画指的是,需要自己创建和管理动画对象,并且将它们应用到动画层,才能显示动画效果。
显式动画的基类为CAAnimation
CAAnimation分为这4种,他们分别是
- 1.CABasicAnimation
- 通过设定起始点,终点,时间,动画会沿着你这设定点进行移动。
- 2.CAKeyframeAnimation
- Keyframe顾名思义就是关键点的frame,你可以通过设定CALayer的始点、中间关键点、终点的frame,时间,动画会沿你设定的轨迹进行移动
- 3.CAAnimationGroup
- Group也就是组合的意思,就是把对这个Layer的所有动画都组合起来。PS:一个layer设定了很多动画,他们都会同时执行,如何按顺序执行我到时候再讲。
- 4.CATransition
- 这个就是苹果帮开发者封装好的一些动画。
1)属性动画—基本动画CABasicAnimation
1
2
3
4
5
6
| CABasicAnimation *opAnim = [CABasicAnimation animationWithKeyPath:@opacity];
opAnim.duration = 1.0;
opAnim.fromValue = [NSNumber numberWithFloat:0.1];
opAnim.toValue= [NSNumber numberWithFloat:1.0];
opAnim.repeatCount = 1;
[view.layer addAnimation:opAnim forKey:@animateOpacity];
|
2)属性动画—关键帧动画CAKeyframeAnimation
1
2
3
4
5
6
7
8
9
10
11
12
13
14
15
16
17
18
19
20
21
22
23
24
25
|
- (void)changeColor
{
CALayer *colorLayer = [CALayer layer];
colorLayer.frame = CGRectMake(0, 0, 64, 64);
colorLayer.position = CGPointMake(0, 150);
colorLayer.backgroundColor = [UIColor greenColor].CGColor;
[self.layer addSublayer:colorLayer];
CAKeyframeAnimation *animation = [CAKeyframeAnimation animation];
animation.keyPath = @"backgroundColor";
animation.duration = 2.0;
animation.values = @[
(__bridge id)[UIColor blueColor].CGColor,
(__bridge id)[UIColor redColor].CGColor,
(__bridge id)[UIColor greenColor].CGColor,
(__bridge id)[UIColor blueColor].CGColor ];
animation.keyTimes = @[@(0.0),@(0.3),@(0.6),@(1.0)];
[colorLayer addAnimation:animation forKey:nil];
}
|
3、动画组
1
2
3
4
5
6
7
8
9
10
11
12
13
14
15
16
17
18
19
20
21
22
23
24
25
26
27
28
29
30
31
32
| //TODO:CAAnimationGroup动画组
- (void)changeColor2
{
//1.创建CALayer对象
CALayer *colorLayer = [CALayer layer];
colorLayer.frame = CGRectMake(0, 0, 64, 64);
colorLayer.position = CGPointMake(0, 150);
colorLayer.backgroundColor = [UIColor greenColor].CGColor;
[self.layer addSublayer:colorLayer];
//创建动画1
CAKeyframeAnimation *animation1 = [CAKeyframeAnimation animation];
animation1.keyPath = @"position";
animation1.path = bezierPath.CGPath;
animation1.rotationMode = kCAAnimationRotateAuto;
//创建动画2
CABasicAnimation *animation2 = [CABasicAnimation animation];
animation2.keyPath = @"backgroundColor";
animation2.toValue = (__bridge id)[UIColor redColor].CGColor;
//创建动画组
CAAnimationGroup *groupAnimation = [CAAnimationGroup animation];
groupAnimation.animations = @[animation1, animation2];
groupAnimation.duration = 4.0;
//将动画应用到Layer层
[colorLayer addAnimation:groupAnimation forKey:nil];
}
|
4、过度动画CATransition
1
2
3
4
5
6
| 动画的开始与结束的快慢,有五个预置分别为(下同):
kCAMediaTimingFunctionLinear 线性,即匀速
kCAMediaTimingFunctionEaseIn 先慢后快
kCAMediaTimingFunctionEaseOut 先快后慢
kCAMediaTimingFunctionEaseInEaseOut 先慢后快再慢
kCAMediaTimingFunctionDefault 实际效果是动画中间比较快.
|
1
2
3
4
5
6
7
8
9
10
11
12
13
14
15
16
17
18
| - (void)transitionForView:(UIView)view
{
CATransition *caTransition = [CATransition animation];
caTransition.duration = 0.5;
caTransition.delegate = self;
caTransition.timingFunction = [CAMediaTimingFunction functionWithName:kCAMediaTimingFunctionEaseIn];
caTransition.type = kCATransitionReveal;
caTransition.subtype = kCATransitionFromLeft;
[self.layer addAnimation:groupAnimation forKey:nil];
}
|
Block块实现
1
2
3
4
| [UIView animateWithDuration:DURATION animations:^{
[UIView setAnimationCurve:UIViewAnimationCurveEaseInOut];
[UIView setAnimationTransition:transition forView:view cache:YES];
}];
|
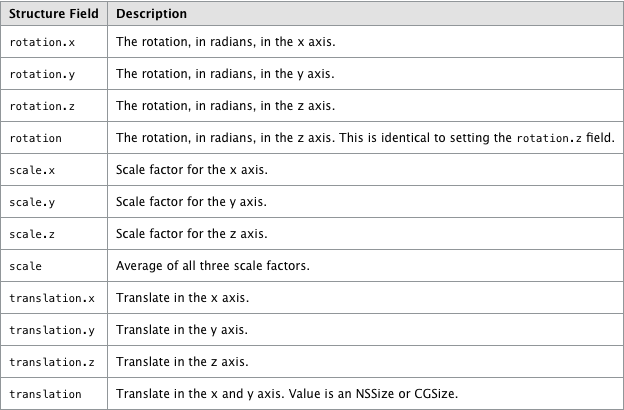
都有哪些animationWithKeyPath,如图
参考:https://www.objc.io/issues/12-animations/animations-explained/
http://www.apeth.com/iOSBook/ch17.html